Software Instructions
Please Log In for full access to the web site.
Note that this link will take you to an external site (https://shimmer.mit.edu) to authenticate, and then you will be redirected back to this page.
This term in 6.310 we will use the Arduino IDE 2.3.2 for editing, compiling, downloading, and plotting (using its serial plotter and serial monitor), but there are modifications and add-ins we will need. In particular, please
- Install Arduino IDE 2.3.2,
- Modify the Arduino Serial plotter to plot 500 points
- Install the Teensy 4.1 board into the Arduino IDE 2.3.2.
- Download and install the lib6310.zip library
- and finally, download and test the the 6310_OPTO_24 Sketch.
The instructions for each of the five steps are below, and
DOWNLOAD AND RUN FROM YOUR COMPUTER'S LOCAL FILESYSTEM !
We have seen many cases where the software fails when using files located on the cloud, or in dropbox, or some other virtual location. Avoid the problem by only using files resident on your computer.
Installing the Teensyduino software
Please follow the instructions at www.arduino.cc/en/software to install Arduino IDE 2.3.2 on your computer.
Updating the serial plotter
As installed, the serial plotter for Arduino IDE 2.3.2 will only display fifty points at a time, insufficient for our purposes. Fortunately, as described at https://github.com/arduino/arduino-ide/issues/803#issuecomment-1338149431 at the end of https://github.com/arduino/arduino-ide/issues/803 , Arduino IDE 2.3.2's serial plotter is a web application written in javascript, and is easy (sort of) for you to customize and plot 500 points.
Find the installation folder for Arduino IDE 2.3.2, and navigate to the subfolder "Resources/app/lib/backend/resources/arduino-serial-plotter-webapp/static/js". Make a copy of the file main.35ae02cb.chunk.js, in case something goes wrong, and then use any text editor to open the original main.35ae02cb.chunk.js file. Use the text editor's search function to find the text U=Object(o.useState)(50) in the file, then change the 50 to 500, save the file, and then quit the editor.
For some operating systems, it may be necessary to change the permissions for the main.35ae02cb.chunk.js file before you will be allowed to save your changes. And for Mac users, you can usually find the installation folder by searching the Application folder for Arduino IDE.app , then right clicking on it, and choosing "Show Package Contents", and opening the Contents folder.
Troubleshooting tips if you get an error that the software is corrupt / Arduino IDE no longer works
- On Mac, if you see a corrupted file error message, delete Arduino + Arduino IDE from your computer, redownload them from the website, open Arduino IDE first (this is important!), then edit the .js file to change the serial plotter window size.
- For Windows, if you don’t see an .exe file, make sure that you downloaded from the correct link on the website (not the zip file).
Adding Teensy 4.1 support
Please follow the instructions on /https://www.pjrc.com/arduino-ide-2-0-0-teensy-support/ to install support for the Teensy 4.1 controller.
If using a MAC
The link https://www.pjrc.com/teensy/package_teensy_index.json needs to be pasted in a different way than what is described above.
- Click on Arduino IDE on the top left window of the Arduino IDE application.
- Click Settings.
- See the box with label, Additional Board Manager URLs and paste
https://www.pjrc.com/teensy/package_teensy_index.json
Installing the lib6310 library
- Download (but DO NOT UNZIP) our library for the Teensyduino, lib6310.zip (here ) to your Desktop.
- Follow the instructions for adding a .zip library on https://support.arduino.cc/hc/en-us/articles/5145457742236-Add-libraries-to-Arduino-IDE
Test the Teensy Speed Control Sketch.
- Download to your desktop and unzip the Teensy speed control sketch, (6310_OPTO_24.zip ).
- Connect your laptop to the Teensy using the USB-to-microUSB or USB-C-to-microUSB cable. Be sure to plug into the microUSB connector on the TEENSY 4.1 (the large socketed microcontroller), NOT the microUSB connector mounted directly on the 6.310 printed circuit board.
- Connect the microUSB connector mounted directly on the printed circuit board to a 5V USB power supply. You should then see the LED near the microUSB connector glow red (as in the figure below). If you see the LED glowing BEFORE you connect the 5V USB power supply, your Teensy processor has not be modified properly and you should ask for help!
-

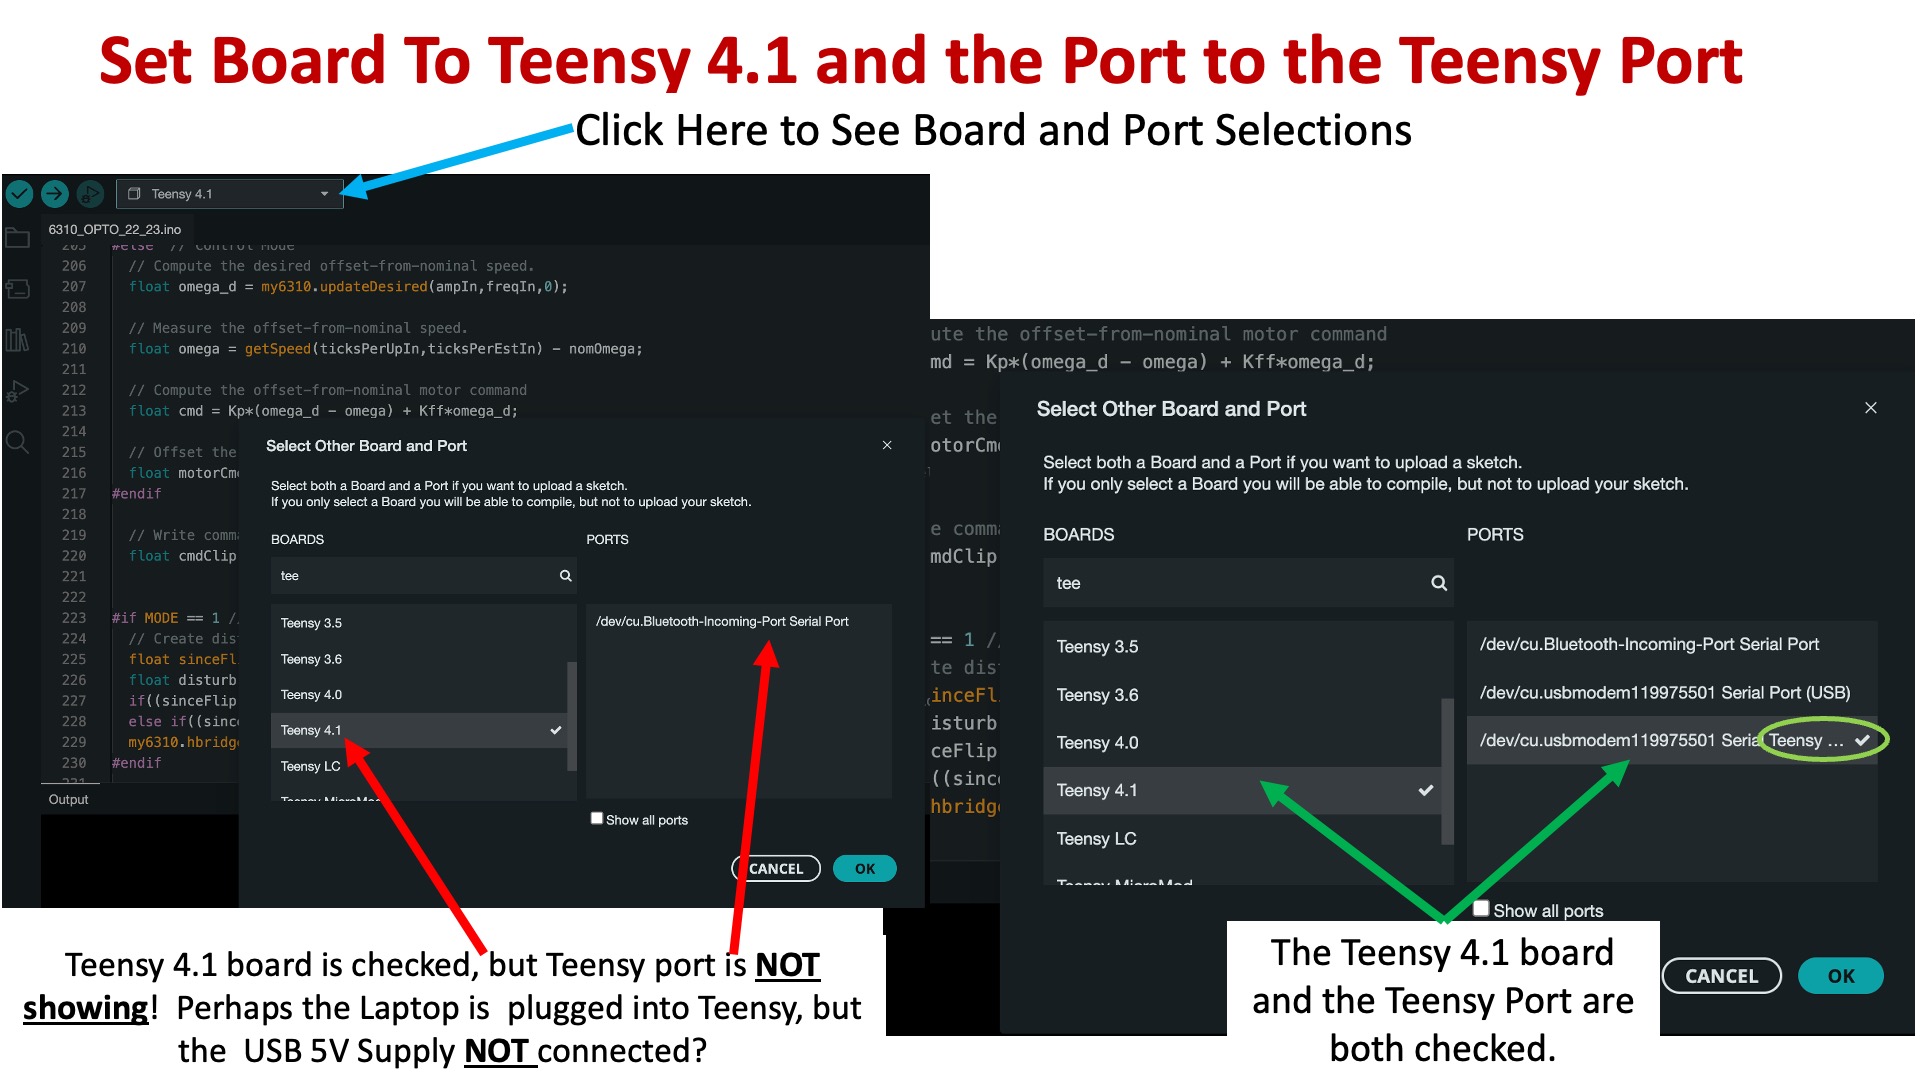
- Open the Arduino IDE 2.3.2 on your laptop, click the down arrow in the board selection box at the left side of the top banner of the IDE, and open up the board and port selection window. Search through the list of boards and select the Teensy 4.1, then search through the list of ports, and select the port that is labeled with "teensy". Finally, close and then reopen the board selection window and verify that the selected board is the Teensy 4.1, and that the selected port has a "teensy" label(see the figure below).
- For Mac/Windows, if you teensy board is not showing up in your ports list on your computer, it is possible that one of the pins on your teensy isn’t soldered properly. Ask staff for help with this.
- Open the 6310_OPTO_24 sketch, and try to compile and download it on to the Teensy 4.1 (click on the right-pointing arrow icon on the lefthand side of the top green banner). If the compile completes with no errors, and the IDE reports a successful upload, then you have installed the IDE, the library, and the control software correctly.
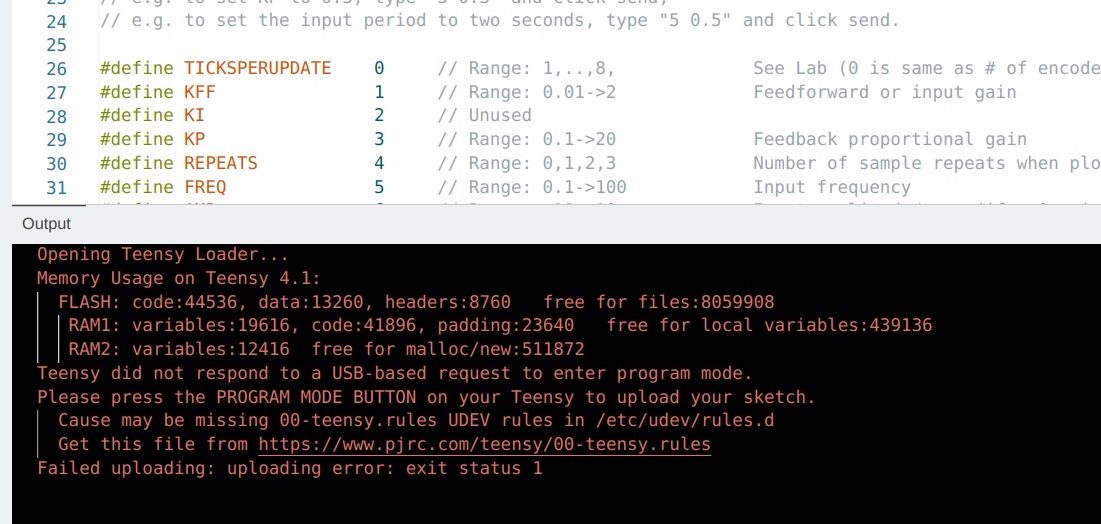
- If the upload fails and you get an error message that indicates a "rules file" is missing (a common problem when using Linux, see image below), use the suggested link and follow the instructions on the associated web page for installing the file.
- If the upload fails, try pressing the small white button on the Teensy 4.1. Or try unplugging and then replugging BOTH the laptop and USB 5V supply connections to the Teensy. Or just try again. Or try quitting out of the Arduino IDE and restarting it. Or try restarting your computer. Or ask for help.
- Once you downloaded the sketch successfully, you are ready to start building first lab!

